How to enable Pre-Trip email for a tour?
Overview
- How to Set Up a Pre-Trip Email
- Adding Email Content
- Choosing When to Send the Email
How to Set Up a Pre-Trip Email
A Pre-Trip email can be used to share special instructions or reminders with your customers before their trip begins.
By default, Pre-Trip emails are inactive and need to be manually set up for each trip.
To set up a Pre-Trip email, log in to your Vacation Labs admin panel and navigate to Products > Trips. Edit the trip you want to update, then go to the Email Notifications section and select Setup Pre-Trip Emails.
Adding Email Content
After clicking the Setup Post-Trip Email button, a blank content field will appear where you can write your own message.
Please notice the highlighted instructions (in red) in the sample pre trip email below:
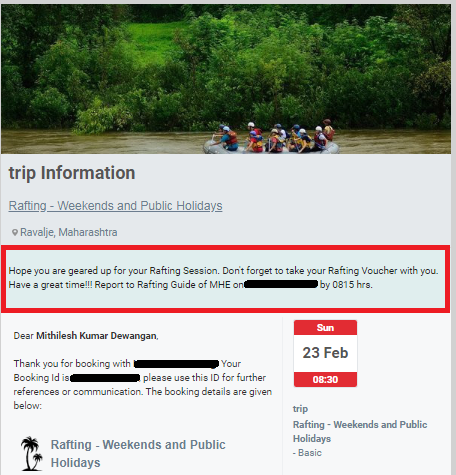
You can use merge tags like {{name}}, {{trip_name}}, and {{departure_date}} to automatically insert customer and trip details into the email when it is sent.
When your email content is ready, click Done to save it.
Choosing When to Send the Email
You will now see the saved email content along with options for how it should be sent:
- Do Not Send – The Pre-Trip email will not be triggered.
- Send Automatically Before the Trip – Lets you set how many hours before the trip starts the email should be sent automatically.
- Ask Me Before Sending – The email will not be sent automatically. Instead, a notification will appear in your Vacation Labs admin panel (bell icon), allowing you to decide manually whether to send it.
Once saved, all new bookings for that trip will follow the Pre-Trip email settings you configured.

Please note: Pre-Trip email settings apply only to bookings made after the setup is saved. Existing bookings will not be affected
Related Articles
How enable Post-Trip email for a tour?
Overview How to Set Up a Post-Trip Email Adding Email Content Choosing When to Send the Email How to Set Up a Post-Trip Email Post-Trip emails let you follow up with customers after their tour is completed. You can use them to thank customers, ...How to create Custom HTML sections for Trip Pages?
Overview Adding a Custom HTML section Enable the "Show as Full Section" option for the field Adding a Custom HTML Section To add a Custom HTML section, go to Settings > Trip Custom Form, then click on Add New Field After that, choose Field Type as ...How to enable Captcha on Contact form?
Please follow these steps to enable Captcha on the Contact us form: Go to WEBSITE > PAGES > CONTACT US > choose CONTACT FORM click on the check box: PREVENT SPAM SUBMISSIONS Go to https://www.google.com/recaptcha/admin Select reCAPTCHA V2 and under ...How to deactivate/delete/unlist a trip
This guide explains how to change the status of a trip in your Vacation Labs account. You may need to do this to temporarily stop bookings, update trip details, or permanently remove a discontinued trip. Key Differences: Deactivate vs. Unlist vs. ...What is a Tour Card section on website?
The Tour Card section in Vacation Labs allows you to display your tours in a card layout on static pages or Home page of your website. Each card typically includes the tour name, banner image, starting price, dates or availability, and a ...