How to send delayed mails via Pipedream
Overview
You can send delayed mails (mails being sent out after or on a predetermined time) after an event occurs such as receiving a new booking or receiving a new inquiry. In this instance we will be sending a Pre trip mail 48 hours before the departure/trip start date.

Please note: you can use this technique to schedule multiple pre and post trip emails (mails before departure date and mails after trip end date) by setting up workflows for each mail you want to send out
- Setting Webhook as trigger in Pipedream
- Sharing the Webhook URL with Vacation Labs Support Team
- Delay function
- Setting Gmail Mail function as the Action
Webhook Event as Trigger
- Login to Pipedream
- Click on Workflows and then on New Workflow (refer screenshot below)
- Give it a name and click on Create Project and Continue (refer screenshot below)
- On the next page, pipedream will ask you to select a Trigger, click on Webhook (refer screenshot below)
- Click on HTTP Requests, Most popular(refer screenshot below)
- On the next page keep the settings as is or change them to your liking and click on Save & Continue (refer screenshot below)
- You will get a unique URL like the screenshot below
- Please share this Unique URL with the Vacation Labs support team (support@vacationlabs.com) and they will get it configured as a webhook in Vacation Labs as well
- Once VL has set it up as a webhook, you can click on Generate test event and then click on Continue (refer screenshot below)
Sharing Webhook with Vacation Labs Team
Once you have generated the Webhook Unique URL (it will appear something like this, refer screenshot below)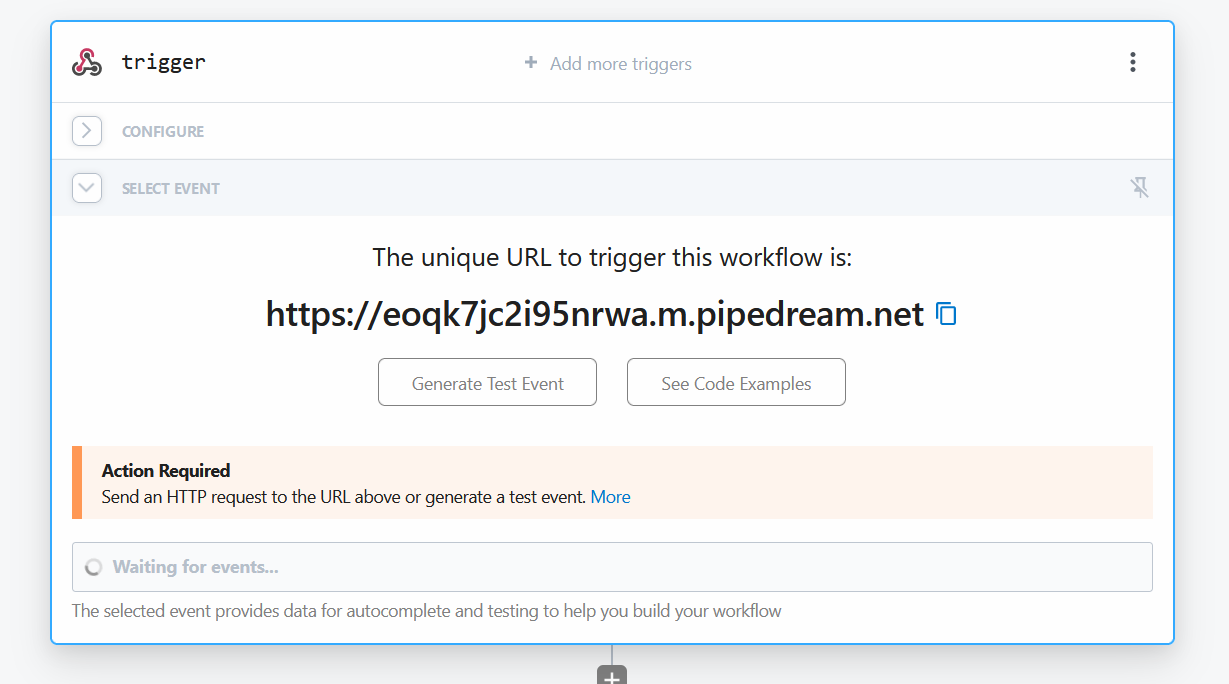
Please share this Webhook URL with the Vacation Labs support team and ask them to configure it as a webhook for one event from the below options (refer screenshot below)
You can share it with the Vacation Labs support team by sending them a mail at support@vacationlabs.com
Setting up Delay Function in Pipedream
- On the next page, search for Delay and click on Delay (refer screenshot below)
- Click on Delay Workflow (refer screenshot below)
- In the next step, you need to specify the trigger in the payload along with the time difference (+/-) from that trigger when you want the workflow to be triggered. Let's break down the example provided:
Trigger: The trigger is determined by the value of steps.trigger.event.start.dateTime. This is a dynamic value representing the start date and time of an event, the departure date of the trip in this context.
Time Difference: This is the amount of time before the event that you want the workflow to be triggered. For example, if you want the workflow to trigger 2 days before the departure date, you subtract 48 hours from the departure date.
Direct Expression: The expression provided calculates the time difference in hours between the current date/time and the departure date. The direct expression is {{ (new Date(steps.trigger.event.start.dateTime) - new Date())/1000/60/60 - 48 }} Let's dissect it:
(new Date(steps.trigger.event.start.dateTime) - new Date()): This calculates the difference in milliseconds between the current date/time (new Date()) and the departure date (steps.trigger.event.start.dateTime).
/1000 : This converts the time difference from milliseconds to seconds.
/60 : This converts the time difference from seconds to minutes.
/60 : This converts the time difference from minutes to hours.
- 48 : This subtracts 48 hours from the calculated time difference to specify the desired trigger time.
Putting it all together, the expression calculates the time difference in hours between the current date/time and the departure date, then subtracts 48 hours to determine when the workflow should be triggered. - Once everything is selected click on Test
- Once the test succeeds then click on Continue

You can find the dynamic payload in the Trigger itself (refer screenshot below) and click on Copy Path next to it and paste it where it is needed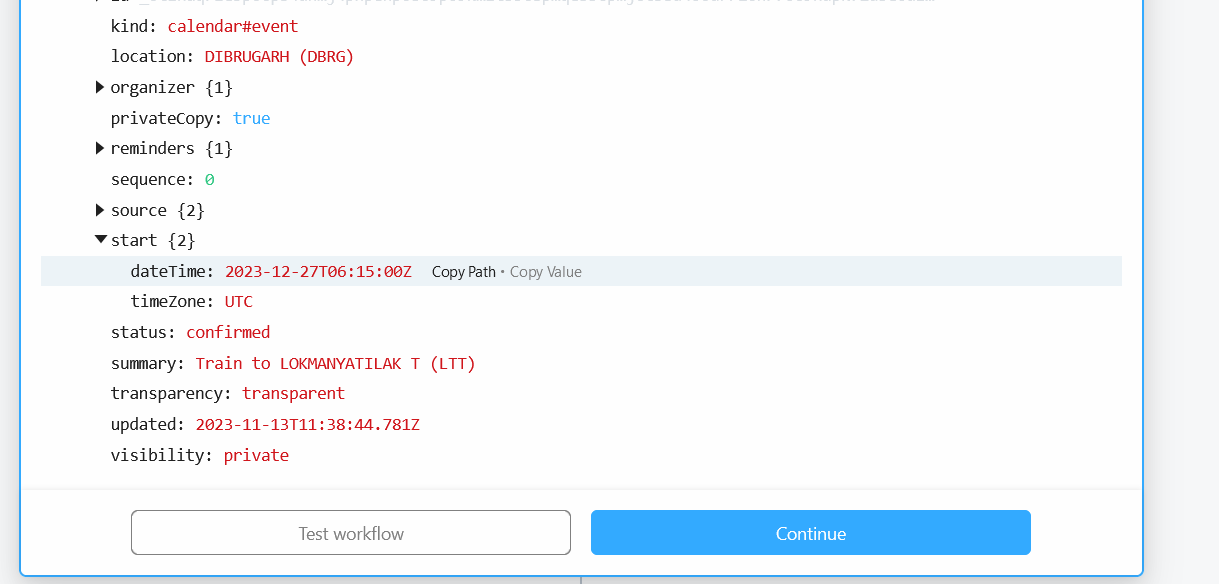
Setting sending Mail function as Action
- Click on the + button to add the mail sending Action (refer screenshot below)
- Search for your mail service provider, here we are searching for GMAIL and then click on it (refer screenshot below)
- And select Send Email as the action event (refer screenshot below)
- Then you can select your Gmail Account
- Select the TO email from the dynamic payload (the customer email will be included in the trigger payload) and customize other aspects of the mail as well such as Subject, Body, CC, BCC etc (refer screenshot below)
- Once done, click on TEST
- Once the test has run successfully you can click on DEPLOY to make the workflow live (refer screenshot below)
Related Articles
Editing content for multiple tours via Accelerate
Overview You can add/edit/remove content for the tours via accelerate. Please Note: You cannot create new trips via Accelerate, you can only edit the content of the existing tours Before your start Adding/modifying/removing content of a tour ...Connecting Mailchimp Account to Vacation Labs via Zapier
Overview Setting up your accounts Connecting Vacation Labs with Zapier Connecting Mailchimp with Zapier Using the appropriate trigger from Vacation Labs in Zapier New booking New passenger New customer New inquiry New contact-form submission ...Updating Tour Addons via Accelerate
Overview Importing tour data Adding/editing tour addons Checking the changes made. Importing tour data Please click here for detailed guide on importing tour data: Importing tour data to Accelerate Adding/Editing the tour addons Please Note: you can ...Integrating VacationLabs with CRM via Zapier
Overview Setting up your accounts Connecting Vacation Labs with Zapier Connecting Zoho CRM with Zapier Connecting Vacation Labs as a trigger in Zapier Connecting CRM as a Action in Zapier Testing and Verification Setting Up Your Accounts: Before you ...Pushing all inquiries from Vacation Labs to Google Sheets using Zapier
Overview We will walk-through the process of pushing all popup inquires received on the following custom inquiry form to a Google Sheet using Zapier. Broadly the steps will be: Setting up your accounts Picking Vacation Labs > New Inquiry as a trigger ...