- The first step to set up a tour is to decide whether it is a short tour, class or certification course, multi day tour or you need custom fields. We have built in type specific features and terminology which will help you customize the tour to your requirements
- After selecting the type of tour, you start by filling the basic details
Basic Details
- You need to decide whether a tour is a shared trip or a private trip. Shared trip is for someone who is willing to share the trip with other participants. Private trip is exclusively for some person or group who does not wish to share their trip with other participants. This is a very important setting which determines how available seats (capacity/inventory) behaves for your trip. Learn more about Shared vs Private trips
- Give a name to your trip. Keep it relevant and informational. Eg Bicycle tour of Borivali national park or White Water Rafting trip
- Set up a unique trip code to identify your trip. Eg BTBNP or WWRaf. This unique trip code helps in inventory management.
- Set the duration of the trip. Duration is the time between beginning and end of the advertised trip.
- Set minimum and maximum number of users that can enrol for a tour. This option helps in planning tours which may not be confirmed as well as closing bookings if there is a possibility of overbooking.
- Overview section gives an outline of your tour/trip/activity. This is the information that will be displayed on the storefront regarding your trip.
- Inclusions are the facilities that are included as part of the package the customer is buying. Eg. Breakfast can be included as a part of a nature trek. This is an optional field which you can activate by clicking the check box.
- Exclusions are the facilities that are not included in the package. These will either be bought extra or won’t be available at all. Giving out this information is a good way to maintain the right expectations. This is an optional field which you can activate by clicking the check box.
- Highlights can include a list of items that your tour/trip/activity will cover. Highlights will help this trip stand out from other trips. You can include the salient features of this trip in this section. This is an optional field which you can activate by clicking the check box.
- Photos section helps you add photos related to your tour/trip/activity. This helps in creating a visually attractive booking page and the right photos can set the correct expectations for the customers.
- Trip specific terms and conditions is an option to specify custom terms and condition that your customer should agree on before proceeding with a booking. Else, you can also add a default link to a URL which hosts your terms and conditions.
Click Save and Next to head to the next set of details to be filled.
Prices and Rates

- You need to start by specifying an advertised price. This is the price which will be displayed as “starting from” to entice the customer to go ahead and complete the purchase.
- Next, you need to add rates per participant types. You can choose standard participant type from the drop down or specify a custom participant type. You can give a name to the custom participant type (Eg. Navy veteran) and enter a description for that type. (Eg. Ex service men from the Indian navy) You will also have an option of booking slots for a participant type. (Eg. A couple will occupy 2 slots)
Calendar
- Calendar is the page where you open time slots on different days for which the tour/activity will be conducted.You have an option to Open timeslots on the top of the page.
- When you click on it, a pop-up window opens which helps you select a start date and time. It has a checkbox for repeating this selection for upcoming days or weeks. You can also edit the pricing and capacity that you had set in the earlier page.
- Once your timeslots are defined, you can further click on any particular date and make changes specific to that date. The advantage of doing this is that you can factor in weekend traffic or holidays without going through the process of creating another variant.
Once your calendar is set with options of capacity and price and customized according to holidays and weekends it is time to save and go to the next page
Settings
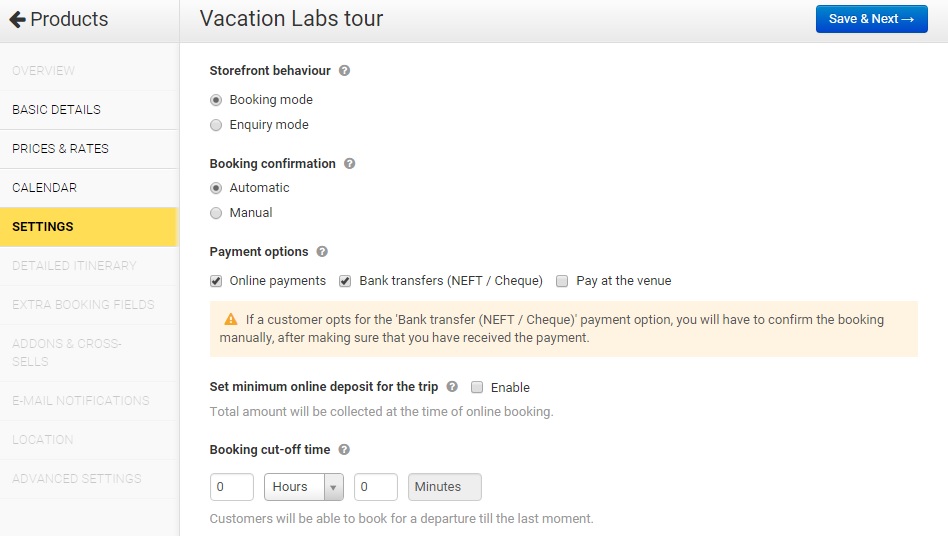
- This page gives you the flexibility to customize the behaviour of your store front. There is a high level of uncertainty that the tour operators have to face. Hence the first option is whether the storefront needs to work in enquiry or booking mode.
- Booking confirmation allows you to automatically confirm the bookings once the payment is made or manually confirm the booking even though it is paid for.
- Payment options include online payments, bank transfers and pay at venue. Online payments are the payments that have gone through a payment gateway linked to the storefront. Bank transfers include NEFT or RTGS transfers done outside the scope of the storefront. These are considered as manual bookings as the booking system cannot verify the fund transfer. Selecting Pay at the venue as a mode of payment gives customers the option to pay for their tour/trip/activity at the venue. This will be regarded as an automatic booking.
- Our system supports a minimum deposit where the customer can pay a specific deposit amount (a percentage of the total amount) to confirm the booking. This option is quite useful for higher value tours.
- Booking cut off time is the time beyond which a booking won’t be accepted. This is specified as the time before the tour begins when the booking stops.
- You can use the ‘Sharing seats across trips’ option if the booking for one trip affects the availability/inventory of another trip. It is a great way to allocate shared resources and get the maximum output from limited resources. You can share seats across trips or even close out other trips on same time slot
- Advanced setting helps you set default behaviour if minimum number of seats is not met or maximum number is breached. You get an option to record bookings as enquiry or keep the booking as awaiting confirmation. You can also set default warning messages to be displayed in these cases.
- You can set the date display to customers as a calendar or list view. You can set additional departure information by clicking the ‘show more settings’ option.
By clicking SAVE & NEXT you are directed to the next screen.
Your booking is done at this stage and you can check the booking form you have created. You can also continue to filling up additional details by clicking continue.
Detailed itinerary
- Giving out maximum information increases the trust in your business. We recommend you to fill the detailed itinerary with maximum available details.
Extra Booking fields
- You can capture additional customer data while the booking is being completed. This data can have specific uses in organizing the tour and can also serve as useful data to analyse your customer base.
- You can capture details per booking/ per participant and as optional or mandatory. You can also give out an option to sign up for your newsletter. You can use the field options that are pre-set or create your own custom fields.
Addons and Cross selling
- You can have add ons and cross selling options as a part of the bookings form. The customer will have an option to opt for additional products or services.
Email notifications
- You can customize the email communication from the storefront to your customer by editing the defaults under this page.
Location
- You can pin your business location or meeting point on a map using this option. You also have an option to specify a popular name for the location which may not be its official name. This will help your customers find you.
Advanced settings
- The advanced setting tab helps you customize the labels for the trip. ie. Common use of words to refer to trip and other standard terms
- There are options to take control over your SEO by specifying Meta Title, keywords and description.
Your tour is set for now. You can refer to further documentation for managing your bookings and integrating the storefront with your website.